Hi Guys, In this post I am going to show how to install Apple Mac OS on a Windows Based PC.
In this world who don't want to buy a Apple Mac PC. But due to some reasons we can't afford it. For such type of users there is also a way by which you can run Mac OS on your Windows PC.
Here is a screenshot of my Mac OS X
Steps to run Mac OS X on a Windows PC.
Now choose 'Apple Mac OS X' and choose 'Mac OS X 10.7' (In my case you try withh different version according to your vmdk disk) and click on Next.
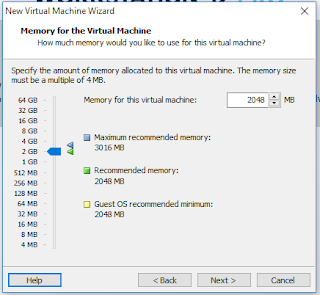
Now set memory for your virtual machine. Here memory is used for RAM not as internal memory.
Now choose 'NAT' in network bridge selection and click on Next.
Now choose 'LSI Logic' controller in I/O controller selection box and click on Next.
Now choose 'SATA' in virtual disk selection box and click on Next.
Now choose 'Use an existing virtual disk' and click on Next.
Now power on your virtual machine and enjoy Apple Mac OS X on your Windows PC. If you want to increase performance of your Mac system then install VMware tools from the VM menu.
Thanks :-)
In this world who don't want to buy a Apple Mac PC. But due to some reasons we can't afford it. For such type of users there is also a way by which you can run Mac OS on your Windows PC.
Here is a screenshot of my Mac OS X
Steps to run Mac OS X on a Windows PC.
Step 1:
First of all download the Mac OS X .vmdk file from the link Download.Step 2:
Now download VMware Workstation from this link Download and install it.Step 3:
After installing open the VMware and click on 'Create a New Virtual Machine'. A dialog box will open.Step 4:
Click on 'Custom(Advanced)' and then click on Next.Step 5:
Now choose the option 'I will install the operating system later' and click on Next.Step 6:
Now choose 'Apple Mac OS X' and choose 'Mac OS X 10.7' (In my case you try withh different version according to your vmdk disk) and click on Next.
Note:
If the option Apple Mac OS X is not visible in your workstation then follow these steps.- Download VMware Workstation Unlocker
- Extract it and open its extracted folder.
- Right click on win-install.cmd and click on Run as administrator.
- Click Yes and wait for the completion of the program.
Step 7:
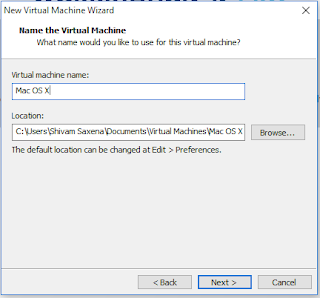
Enter your virtual machine name and click on Next.Step 8:
Now choose firmware type 'EFI' and click on Next.Step 9:
Now set your number of processors you wish to give to your virtual machine and click on Next.Step 10:
Now set memory for your virtual machine. Here memory is used for RAM not as internal memory.
Step 11:
Now choose 'NAT' in network bridge selection and click on Next.
Step 12:
Now choose 'LSI Logic' controller in I/O controller selection box and click on Next.
Step 13:
Now choose 'SATA' in virtual disk selection box and click on Next.
Step 14:
Now choose 'Use an existing virtual disk' and click on Next.
Step 15:
Now click on 'Browse...' and select your downloaded .vmdk file and click on Next.Note:
If your VMware version is higher than your vmdk file then it will ask you for converting it. In such case click on 'Keep existing format'.Now power on your virtual machine and enjoy Apple Mac OS X on your Windows PC. If you want to increase performance of your Mac system then install VMware tools from the VM menu.
Thanks :-)


No comments:
Post a Comment